# 1.2 构建前端 (Building a Frontend)
## 构建一个前端来与你的合约进行交互 (Building a Frontend to Interact With Your Contract)
To build out our frontend application, we'll do the following:\
要构建我们的前端应用,我们将执行以下操作:
1. **Initialize a React project.**\
**初始化一个 React 项目。**
2. **Install the `fuels` SDK dependencies.**\
**安装 `fuels` SDK 依赖。**
3. **Write our frontend code.**\
**编写前端代码。**
4. **Run our project.**\
**运行项目。**
### 初始化一个 React 项目 (Initialize a React project)
To split our project's contract from frontend code, let's create a new folder `frontend` where we'll initialize our frontend project.
为了将项目的合同与前端代码分开,让我们创建一个新文件夹 `frontend`,我们将在其中初始化我们的前端项目。
In the terminal, go back up one directory and initialize a react project using [`Create React App`](https://create-react-app.dev/).\
在终端中,返回一个目录并使用 [`Create React App`](https://create-react-app.dev/) 初始化一个 React 项目。
```
$ cd ..
$ npx create-react-app frontend --template typescript
Success! Created frontend at Fuel/fuel-project/frontend
```
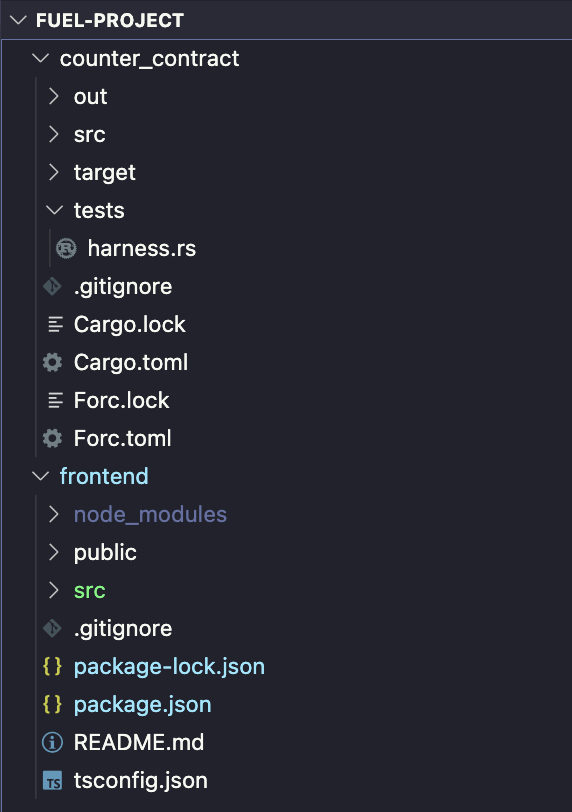
You should now have your outer folder, `fuel-project`, with two folders inside: `counter-contract` and `frontend`
你现在应该有你的外部文件夹,`fuel-project`,里面有两个文件夹:`counter-contract` 和 `frontend`
#### 安装 `fuels` SDK 依赖 (Install the `fuels` SDK dependency)
The `fuels` umbrella package includes all the main tools you need for your frontend; `Wallet`, `Contracts`, `Providers`, and more.
`fuels` umbrella 包,含有前端所需的所有主要工具; `Wallet`、`Contracts`、`Providers` 等等。
Also, it contains the routines for ABI TypeScript generation.
此外,它还包含 ABI TypeScript 生成的例程。
> ABI stands for Application Binary Interface. ABI's inform the application the interface to interact with the VM, in other words, they provide info to the APP such as what methods a contract has, what params, types it expects, etc...
>
> ABI 代表应用的二进制接口。 ABI 通知应用与 VM 交互的接口,换句话说,它们向应用提供信息,例如合约具有哪些方法、哪些参数、它期望的类型等……
#### 安装 (Installing)
Move into the `frontend` folder, then run:\
移至`frontend` 文件夹,然后运行:
```
$ cd frontend
$ npm install fuels@0.35.0 --save
added 114 packages, and audited 115 packages in 29s
```
#### 生成合约类型 (Generating contract types)
To make it easier to interact with our contract we use `fuels typegen` command to interpret the output ABI JSON from our contract, and generate Typescript definitions based on it. This JSON was created when we executed the `forc build` command to compile our Sway Contract into binary.
为了更轻松地与我们的合约进行交互,我们使用`fuels typegen` 命令,来解析我们合约的输出 ABI JSON,并基于它生成 Typescript 定义。这个 JSON 是在我们执行`forc build` 命令将我们的 Sway 合约编译成二进制文件时创建的。
If you see the folder `fuel-project/counter-contract/out` you will be able to see the ABI JSON there. If you want to learn more, read the [ABI spec](https://fuellabs.github.io/fuel-specs/master/protocol/abi).
如果您看到文件夹`fuel-project/counter-contract/out`,您将能够在那里看到 ABI JSON。如果您想了解更多信息,请阅读 [ABI 规范](https://fuellabs.github.io/fuel-specs/master/protocol/abi)。
Inside the `fuel-project/frontend` directory run:
在`fuel-project/frontend` 目录中运行:
```
$ npx fuels typegen -i ../counter-contract/out/debug/*-abi.json -o ./src/contracts
Generating files..
- src/contracts/CounterContractAbi.d.ts
- src/contracts/factories/CounterContractAbi__factory.ts
- src/contracts/index.ts
Done.⚡
```
Now you should be able to find a new folder `fuel-project/frontend/src/contracts`. This folder was auto-generated by our `fuels typegen` command, and these files abstract the work we would need to do to create a contract instance, and generate a complete TypeScript interface to the Contract, making easy to develop.
现在您应该能够找到一个新文件夹`fuel-project/frontend/src/contracts`。这个文件夹是由`fuels typegen` 命令自动生成的,这些文件抽象了我们创建合约实例需要做的工作,并为合约生成了一个完整的 TypeScript 接口,使得开发变得容易。
#### 创建一个钱包(再次) Create A Wallet (Again)
For interacting with the fuel network we have to submit signed transactions with enough funds to cover network fees. The Fuel TS SDK doesn't currently support Wallet integrations, requiring us to have a non-safe wallet inside the WebApp using a privateKey.
为了与 Fuel 网络进行交互,我们必须提交带有足够资金的签名交易,来支付网络费用。 Fuel TS SDK 目前不支持钱包集成,要求我们在 WebApp 中拥有一个使用私钥的非安全钱包。
> **Note**: This should be done only for development purpose. Never expose a web app with a private key inside. The Fuel Wallet is in active development, follow the progress [here](https://github.com/FuelLabs/fuels-wallet).
>
> **注意**:这应该只用于开发目的。切勿公开带有私钥的 Web 应用。 Fuel Wallet 正在积极开发中,请在[此处](https://github.com/FuelLabs/fuels-wallet) 关注进展。
In the root of the frontend project create a file named `createWallet.js` and add the following code:
在前端项目的根目录中创建一个名为 `createWallet.js` 的文件,并添加以下代码:
File: `./frontend/createWallet.js` 文件:`./frontend/createWallet.js`
```
const { Wallet } = require("fuels");
const wallet = Wallet.generate();
console.log("address", wallet.address.toString());
console.log("private key", wallet.privateKey);
```
In a terminal, run the following command:
在终端中,运行以下命令:
```
$ node createWallet.js
address fuel160ek8t7fzz89wzl595yz0rjrgj3xezjp6pujxzt2chn70jrdylus5apcuq
private key 0x719fb4da652f2bd4ad25ce04f4c2e491926605b40e5475a80551be68d57e0fcb
```
> **Note**: You should use the generated address and private key.\
> **注意**:您应该使用生成的地址和私钥。
Save the private key, you will need this later to set it as a string value for a variable `WALLET_SECRET` in your `App.tsx` file. More on that below.
保存私钥,稍后您将需要它来将其设置为 `App.tsx` 文件中变量`WALLET_SECRET`的字符串值。更多内容后面详述。
First, take the address of your wallet and use it to get some coins from [the testnet faucet](https://faucet-beta-3.fuel.network/).
首先,获取您钱包的地址,并使用它从[测试网水龙头](https://faucet-beta-3.fuel.network/) 获取一些代币。
Now you're ready to build and ship ⛽
现在您已准备好构建和发布 ⛽
> **Note**: The team is working to simplify the process of creating a wallet, and eliminate the need to create a wallet twice. Keep an eye out for these updates.
>
> **注意**:团队正在努力简化创建钱包的过程,并消除创建钱包两次的需要。请留意这些更新。
#### 改进应用 (Modify the App)
Inside the `frontend/src` folder let's add code that interacts with our contract. Read the comments to help you understand the App parts. Change the file `fuel-project/frontend/src/App.tsx` to:
在 `frontend/src` 文件夹中,让我们添加与合约交互的代码。阅读评论可以帮助您了解应用部件。将文件`fuel-project/frontend/src/App.tsx` 更改为:
File: `./frontend/src/App.tsx` 文件:`./frontend/src/App.tsx`
```
import { useEffect, useState } from "react";
import { Wallet } from "fuels";
import "./App.css";
// Import the contract factory -- you can find the name in index.ts.
// You can also do command + space and the compiler will suggest the correct name.
import { CounterContractAbi__factory } from "./contracts";
// The address of the contract deployed the Fuel testnet
const CONTRACT_ID =
"0x2c38161e42ce14abdaa7950c04b13aa340eb67cf196c94b971d5f0175417f4f4";
//the private key from createWallet.js
const WALLET_SECRET =
"0x07960a5124cd6e52b595aed727d640aed2e32cc587a34c09f1b48615378df752";
// Create a Wallet from given secretKey in this case
// The one we configured at the chainConfig.json
const wallet = Wallet.fromPrivateKey(
WALLET_SECRET,
"https://beta-3.fuel.network/graphql"
);
// Connects out Contract instance to the deployed contract
// address using the given wallet.
const contract = CounterContractAbi__factory.connect(CONTRACT_ID, wallet);
function App() {
const [counter, setCounter] = useState(0);
const [loading, setLoading] = useState(false);
useEffect(() => {
async function main() {
// Executes the counter function to query the current contract state
// the `.get()` is read-only, because of this it don't expand coins.
const { value } = await contract.functions.count().get();
setCounter(Number(value));
}
main();
}, []);
async function increment() {
// a loading state
setLoading(true);
// Creates a transactions to call the increment function
// because it creates a TX and updates the contract state this requires the wallet to have enough coins to cover the costs and also to sign the Transaction
try {
await contract.functions.increment().txParams({ gasPrice: 1 }).call();
const { value } = await contract.functions.count().get();
setCounter(Number(value));
} finally {
setLoading(false);
}
}
return (
Counter: {counter}
);
}
export default App;
```
#### 运行你的项目 (Run your project)
Now it's time to have fun, run the project in your browser.
现在是好好玩玩儿的时候了,在浏览器中运行项目。
Inside the `fuel-project/frontend` directory run:
在`fuel-project/frontend` 目录中运行:
```
$ npm start
Compiled successfully!
You can now view frontend in the browser.
Local: http://localhost:3001
On Your Network: http://192.168.4.48:3001
Note that the development build is not optimized.
To create a production build, use npm run build.
```

#### 你刚刚在 Fuel 上构建了一个全栈 dapp! ⛽ (You just built a fullstack dapp on Fuel! ⛽)
[Here is the repo for this project](https://github.com/FuelLabs/quickstart). If you run into any problems, a good first step is to compare your code to this repo and resolve any differences.
[这是该项目的存储库](https://github.com/FuelLabs/quickstart)。如果您遇到任何问题,最好的第一步是将您的代码与此存储库进行比较并解决任何差异。
Tweet us [@fuel\_network](https://twitter.com/fuel_network) letting us know you just built a dapp on Fuel, you might get invited to a private group of builders, be invited to the next Fuel dinner, get alpha on the project, or something 👀.
您还可以发推给我们 [@fuel\_network](https://twitter.com/fuel_network) ,让我们知道您刚刚在 Fuel 上构建了一个 dapp,您可能会被邀请加入一个私人开发者小组,被邀请参加下一次 Fuel 晚宴,获得 alpha 版项目之类的👀。
#### 更新合约 (Updating The Contract)
If you make changes to your contract, here are the steps you should take to get your frontend and contract back in sync:
* In your contract directory, run `forc build`\
在您的合约目录中,运行`forc build`
* In your contract directory, redeploy the contract by running this command and following the same steps as above to sign the transaction with your wallet: `forc deploy --node-url beta-3.fuel.network/graphql --gas-price 1 --random-salt`\
在您的合约目录中,通过运行此命令,并按照与上述相同的步骤使用您的钱包签署交易,进而重新部署合约:`forc deploy --node-url beta-3.fuel.network/graphql --gas-price 1 --random-salt`
* In your frontend directory, re-run this command: `npx fuels typegen -i ../counter-contract/out/debug/*-abi.json -o ./src/contracts`\
在您的前端目录中,重新运行此命令:`npx fuels typegen -i ../counter-contract/out/debug/*-abi.json -o ./src/contracts`
* In your `fuel-project/frontend` directory, update the contract ID in your `App.tsx` file\
在您的 `fuel-project/frontend` 目录中,更新您的 `App.tsx` 文件中的合同 ID
### 需要帮助? (Need Help?)
Get help from the team by posting your question in the [Fuel Forum](https://forum.fuel.network/).
在 [Fuel 论坛](https://forum.fuel.network/) 中发布您的问题,获得团队的帮助。
---
# Agent Instructions: Querying This Documentation
If you need additional information that is not directly available in this page, you can query the documentation dynamically by asking a question.
Perform an HTTP GET request on the current page URL with the `ask` query parameter:
```
GET https://zenofchain.gitbook.io/fuel-shou-ce-the-fuel-book/1.-kai-fa-zhe-kuai-su-shang-shou-developer-quickstart/1.2-gou-jian-qian-duan-buildingafrontend.md?ask=
```
The question should be specific, self-contained, and written in natural language.
The response will contain a direct answer to the question and relevant excerpts and sources from the documentation.
Use this mechanism when the answer is not explicitly present in the current page, you need clarification or additional context, or you want to retrieve related documentation sections.